Introduction
Welcome to BettrData, your launchpad for no-code data transformation and pipeline automation.
- Who it’s for: Data ops teams, analytics engineers, and anyone tired of ETL chaos.
- Why use it:
- ✅ Automate messy pipelines
- ✅ Standardize schema mapping
- ✅ Export model-ready data in minutes
- Browser Support
- BettrData supports the latest version of Google Chrome.
- We require Chrome 120 or newer for full functionality and security.
- Chrome must have JavaScript enabled.
- We do not support beta, dev, or heavily extension-modified environments.
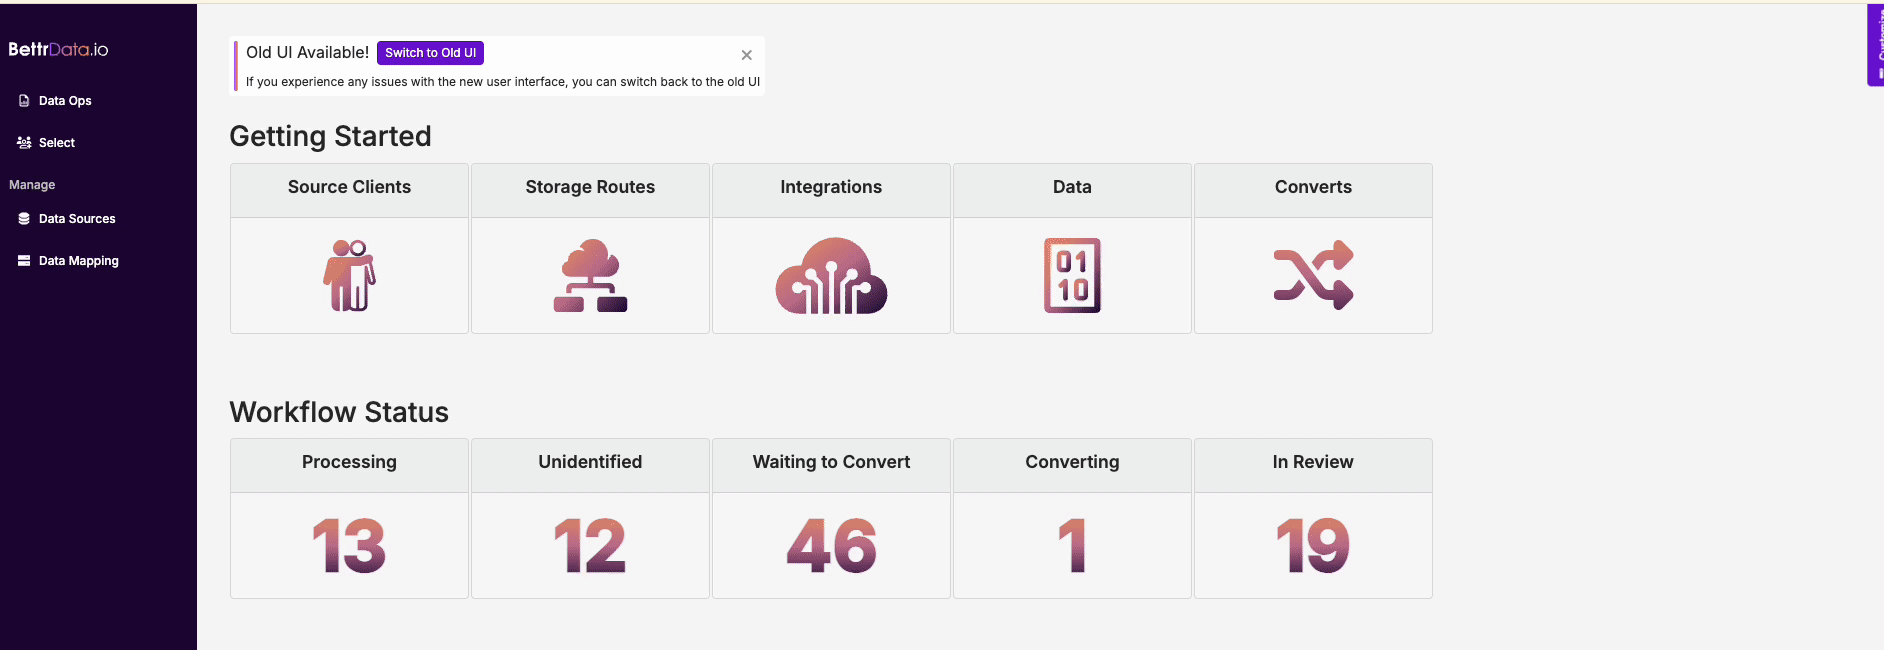
🏠 BettrData Home Overview
The BettrData Home page is your central hub for managing the entire data acquisition and transformation workflow. From here, you can monitor clients, configure routes, manage integrations, and oversee the status of all data moving through the platform.
⚙️Key Actions Available from Home
From the Home page, you can:
📊 Track File Workflow Status
Quickly view and navigate through file statuses in the processing pipeline.
Use the links on the Home page to quickly access each file status view and monitor the progress of data through the pipeline.
📈 Summary Stats
The Home page also displays high-level metrics, such as record counts and file statuses, to give you a quick snapshot of overall platform activity.
🆘 Need Help?
Whether you're troubleshooting an issue or looking for guidance, here’s where to find support:
📨 Contact Us
- Use the Help option in the left Navigation Panel to select the type of support needed, your email, subject and a description of the request with as much detail as possible.
- Submit and this will automatically create a support ticket routed to the appropriate team.
- Prefer email? Click on the email link or reach us directly at support@bettrdata.io.
📚 Documentation
Explore the BettrData User Guide for detailed, step-by-step instructions, best practices, and feature walkthroughs.
🔐 Client Setup
- Add an Owner by going into the left-hand Navigation Sidebar to Data Sources > Data Owners tab > Manage Data Owners > New.
- Add a Data Owners name.
- Click Save and and a client ID will be assign to the client.
- Go to the Actions dropdown and add Contact Information.
- If desired, enable email notifications for file status updates.
- Save.
- Next, add a storage route to begin loading your data.
📂 Adding a Storage Route to Load Files
To be able to transmit data files for one or more owners, you’ll need to create Storage Routes.
- Go into the left-hand Navigation Sidebar to Data Sources > Storage Routes tab > Manage Storage Routes.
- Click on the Select Owner field and enter the new Data Owner Name and Save or select the desired owner from the drop down for the new storage route.
- Click on New Route.
- Select your storage type:
- Create Storage Route - Choose a protocol storage —Local, Cloud, or Server—based on how your data will be transferred, and fill in the necessary connection information.
- Create SFTP account and route - Use this option to create a new SFTP account on files.com, along with a route that BettrData will monitor for incoming files.
- Processing Options:
- Enabled – Checking this will automatically download data from the route. When checked, the No Fail check box becomes editable.
- No Delete – As a default, files are deleted after transmission to reduce the risk of duplication. Check the box if you want to preserve source files after transfer.
- No Fail – If selected, the system will continue attempting to pull in data even if the initial attempt fails.
- Click Save. All required fields highlighted in red must be completed before the Save button will become enabled.
Note: Local protocol auto-populates its connection settings.
Just enter your Name and Email, then hit Create to get started.
📊 Data Ops
After setting up Storage Routes for one or more Owners, the system will begin detecting files associated with those routes. You can now review and manage incoming data files for each owner through the Data Ops page.
- Go to the Data Ops page.
- For any files in Unidentified, Select an Output Schema for the file.
- As the file processes, it will move into the status of Waiting to Convert, click on the Waiting to Convert link in the Status column.
- The BettrData Builder will display.
Files from Owners with enabled routes or files you've manually downloaded will be displayed in the Data list.
🛠️ Builder
The BettrData Builder is the core interface for configuring how raw data is structured, cleaned, and prepared for use. You can map fields, drop records, normalize values, and apply transformation logic to ensure the data conforms to your Output Schema.
- When Open in Builder is selected for a file, the Build New Convert screen will display. From the Builder page, click the Build New Convert button. The BettrData Builder will display.
- Columns for the input file’s field headers and the file’s output schema fields display across the screen along with different action buttons and features that can help you complete an accurate build. Make a selection for each column to identify and confirm the Output Schema Fields.
- Click on any red icons that may display in a column once a selection is made to address Date Format or Map Incoming Values to the output field.
- Check the gray bar for any convert issues that may occur during the build. The red icon
- Click Save when you feel the build is accurate and complete.
- To learn more about the Builder and creating a New Output Schema, see Builder and Creating a New Convert from Scratch.
corresponds to errors and the yellow to warnings.
🔄 Convert
Once you've completed your field mappings in the BettrData Builder, you're ready to run the convert, review reports and generate your standardized output.
🧪 Test Run
- In the gray action bar at the top of the Builder, Run a test convert by selecting test from the Environment dropdown and clicking the Run button.
- After the file completes the test run, click View Report. This will open the report page with results and diagnostics.
- Review the output for any issues. If needed, make corrections to field mappings or thresholds.
- As you adjust, click Save & Validate. The button will turn green once changes are validated.
- Click Close to return to the Run Convert screen.
🔄 Production Run
- Back on the Run Convert screen change the Environment field to Production and click Run to finalize the convert.
🔍 Review
Inspect results, validate accuracy, and resolve any data issues.
- When the Run is complete, the View Report icon will display under the Run button. Click on the icon to view the report page.
- Click Review Complete at the top of the screen to confirm everything looks good after review.
- The data is now standardized and ready for downstream use or export.
- To learn more about transforming the data from its original format into a standardized output, see Run and View Run Report.